🎀 How to make Persona renders in Blender 🎀
 This is a basic Blender tutorial so you can pose these little guys as well ^^
I use a budget laptop from a decade ago, so anyone can make renders regarless of their equipment!
I'm a newie as well, but I hope you find this useful. Back when I started out I had no one to ask to, and so fumbled on lots of things for weeks all alone, so I don't want others to feel that frustration.
This will be a LONG read, this tutorial assumes this is your very first time touching Blender and anything 3D relatedAlso while this is aimed towards Persona models, some info can be used for general renders as well
Dec/2023 Update: Changed some wording, added more Blender version info, how to manually fix separated faces& fix another XPS problem
🎀 Blender - Which version?
The downside is that 2.8 has a HIGH tendency to crash and takes very long to render in Cycles (at least on my laptop).
Blender 3.3 and up is WAY optimized, both the way it handles models and the rendering times. But while the pluggings work on it, they run into some problems. For CATS, the plugging we will use, exporting models, fixing models & optimization are broken on 3.3
You can have various versions of Blender on your PC, so you can always import & fix all the models you need on 2.8 and then open the file in 3.3 to work with. (The reverse is not posible. You can't open a 3.3 file on 2.8)Here's the official archive of Blender versions to download
🎀 Blender - Basic interface & important concepts
I will try go bits by bits. First off, vocabulary. We aren't gonna use all of these here, but it's always good to know them:
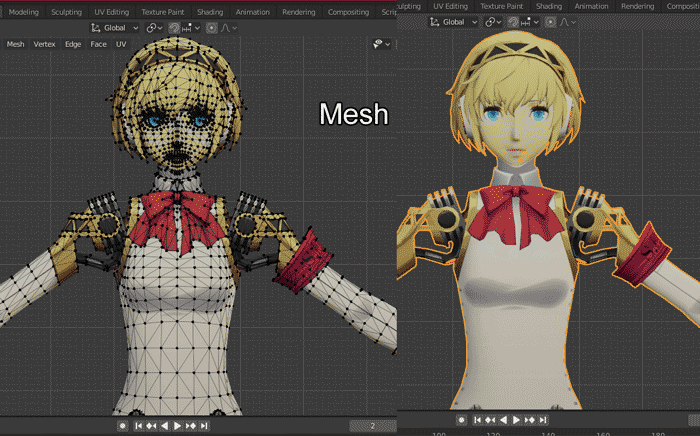
- Mesh - The group of little triangles/squares that make up a model.
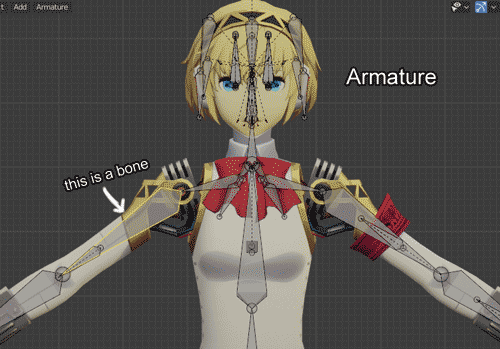
- Bone - What is used to move the model.
- Armature - All of the mesh's bones.
- Object - The group of meshes & armature
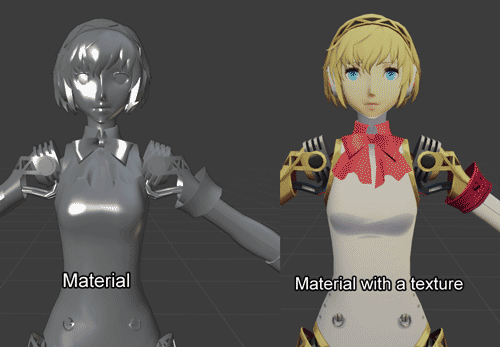
- Material - What your object is made of. It can be refflective, opaque, rought, etc.
- Texture/Base color - The image/color you use to wrap your object.
- Shader - How textures display lights and shadows when rendering. For example you can have a "Toon" Shader, where the shadows are a cell-shaded plain color, or "Realistic" Shader. Each texture can have its own shader.
- Parent/Children - You can "connect" one or various meshes ("children") to another mesh ("parent"). The children will follow any transformation you use on the parent.
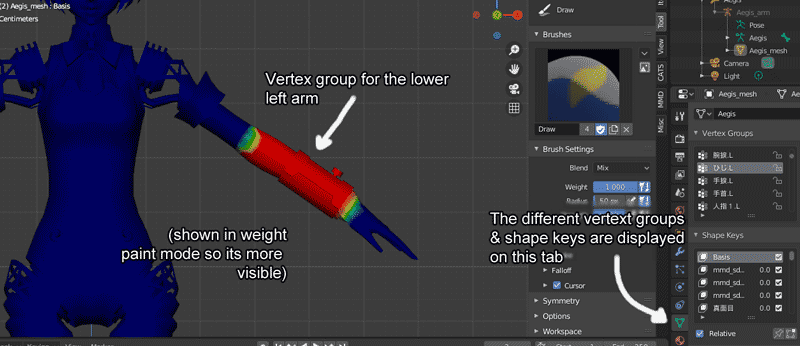
- Vertex Group - "Marks" you put on the mesh so Blender know what it is.
- Shape Keys - "Pre-made" transformations of bones and/or meshes. They can be used to change the character's expresion (bone transformation), hide body parts (mesh transformation) and more by simply dragging a slider instead of having to move bones/meshes manually every time.
(open the tutorial's images on a new tab for full size)
Interface, move around & modes:
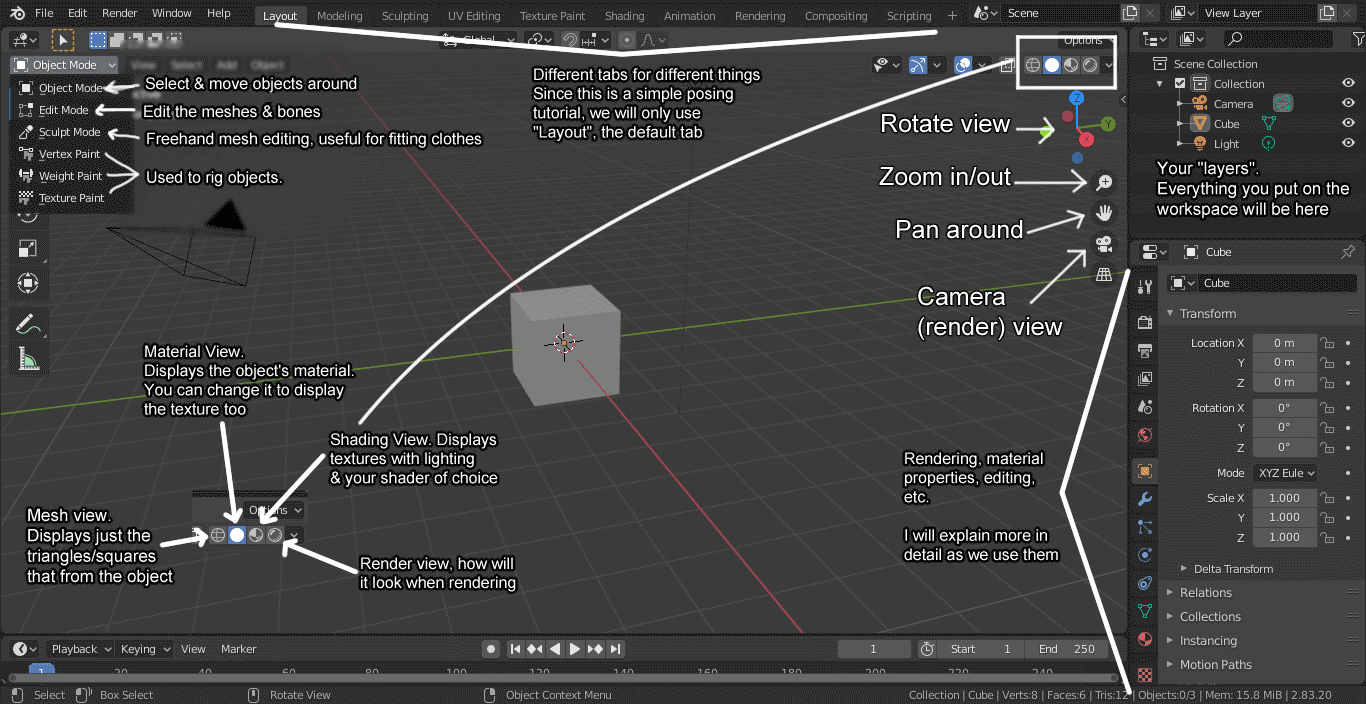
Hope this is readable! I will explain some of these better below. The workspace is where that cube is, the place where you will put all your models and such.
To move around you can use your mouse as well. On the navibar on top, click Edit > Preferences > Input then under Mouse select "Emulate 3-button mouse". If you have a 3-buttom mouse, ignore that & use the 3rd button intead of ALT
- Rotate view: ALT + move the mouse
- Pan around: Shift + ALT + move the mouse
- Zoom in/out: Roll the mouse scroll wheel
And finally, the most common shortcuts you will need:
- [G] - Move things around
- [R] - Rotate
- [S] - Scale
- [X] - Delete
- [N] - Shows the tab with transform & tool options, and most importantly, where CATS and other plugins are.
- SHIFT + [A] - Add meshes, lights etc.
- Numberpad [1] [3] [7] [9] - Change to different orthographic views
- Number pad [0] - Change to camera/render view
🎀 Plugins needed & Resources
MMD Tools & XPS Tools - VERY optional since CATS can already import these models onto blender, but if you ever want to use MMD or XNLara, they can come in handy.
CATS already comes with MMD Tools apparently, but I had that one installed before CATS so I can't confirm lmao.
Persona models & such:
Twitter user WukiWakoto made a super useful >masterpost of Persona 3D resources, so check it out! Some resources were only shared as Discord media, so that masterpost is the only way to download them unless you contact the owners directly.... That doc is 80% of what you need tbh.Other resources I find useful are:
- Bunnxarts - Backgrounds/stages from P4 and P3D
- Sasuke-bby - XPS ports of tons of Persona models, including PS2 models, P5, Dancing, P5X, PQ etc etc. Has lots of backgrounds as well.
- Elina002 - MMD ports of P3-5D character models. MMD models are simple and already have all the body parts attached, so they're very easy to work with.
- EilaKasai - Has a few models packs for MMD (prev link are the characters on their main outfit, but this one has costumes).
- Literally any MMD group and/or modeler on Devianart, infinite costumes and backgrounds.
- BowRoll - Japanese site & hard to find stuff with, but it has great 3D models for free, mostly MMD. Sometimes the link is behind a password or login, so be sure to DeepL/Google translate the caption.
🎀 Importing Persona models
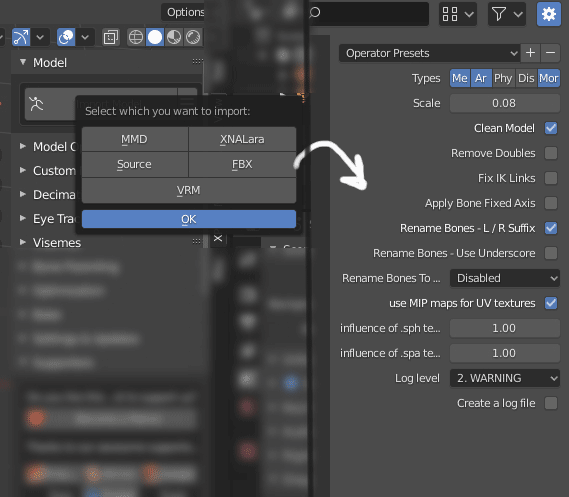
Press [N] to open the sidebar, click on the CATS tab and then "Import model". You can import any model type that CATS acepts like this.
If you want more control over how the model gets exported, you can click the menu next to the "Import Model" button and it will give you more options specific to that file type, but the usual Import button does the work correctly 90% of the time.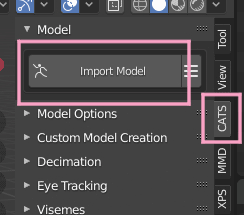
And.... hi Ken? To show the object's colors, change to either Shading or Rendering view, they're right on top of the CATS menu.
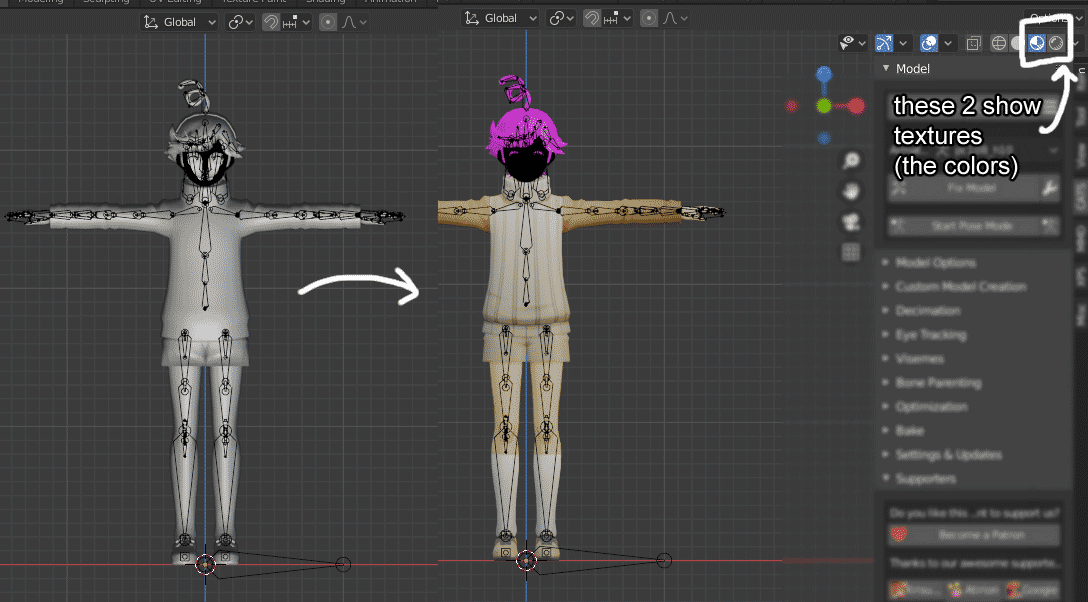
Well, that looks weird. Before we fix the poor kid, let's take a look to your Scene Collection.
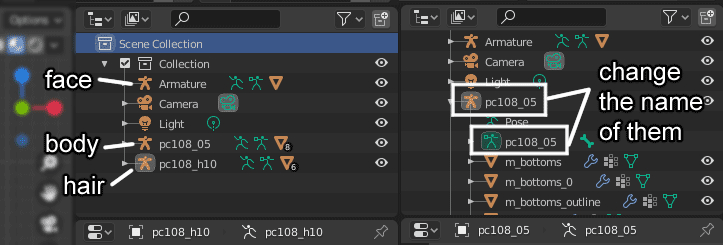
There are more things now! I'm using the fixed FBX models, so he's split in 3 objects. The eye next to each object hides it from view (but not from the final render)
And for the sake of organization, please change the name of each object & armature (what I highlighted, pick the same name for both, ie ken_hair). It will make the whole process much easier, specially if you have multiple objects.🎀 Fixing common model issues
The "fun" part. These creatures are Messy.... Depending on which model you're using, the have different quirks, so I will divide this by filetype..FBX
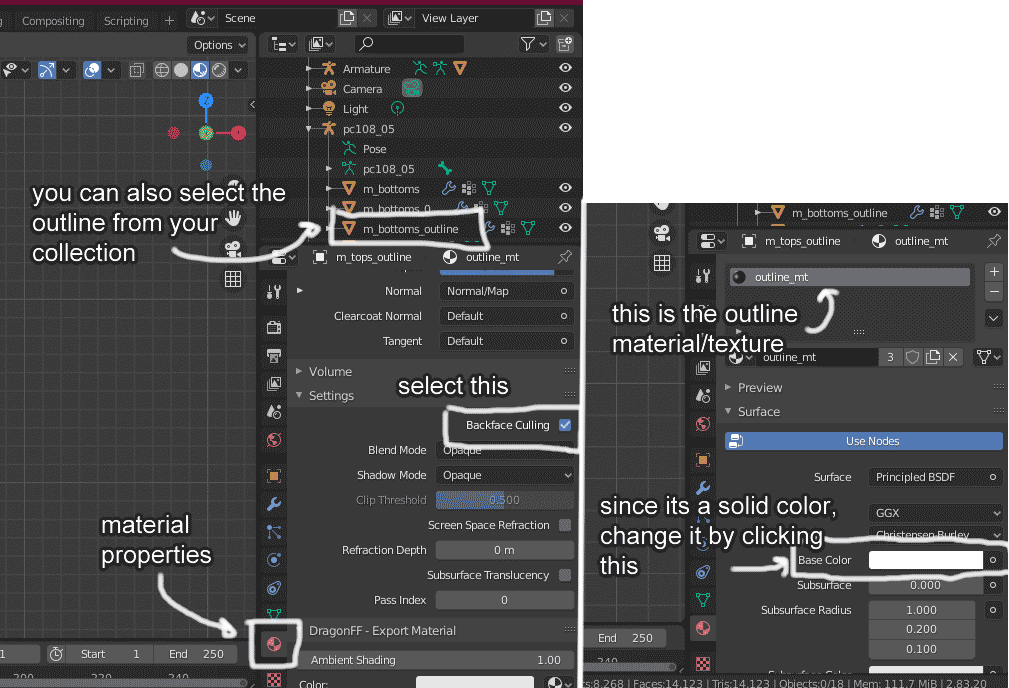
Those are the cartoon outlines you see in-game. If you don't want them, click the white/black mesh and then press [X] to delete it. You can also select [m_bodypart_outline] on your collection, and then right click -> delete
If you want them, click on the white/black mesh -> go to Material Properties -> scroll down & check "Backface Culling".If you want the outline to be another color, scroll up on the Material Properties and click on the white rectangle called "Base Color" (Note: "Backface Culling" only appears if you have set Eevee as your rendering engine. For Cycles, this option doesnt appear and it always displays the meshes fully, you have to delete the outline mesh or else your model will show fully black/white)
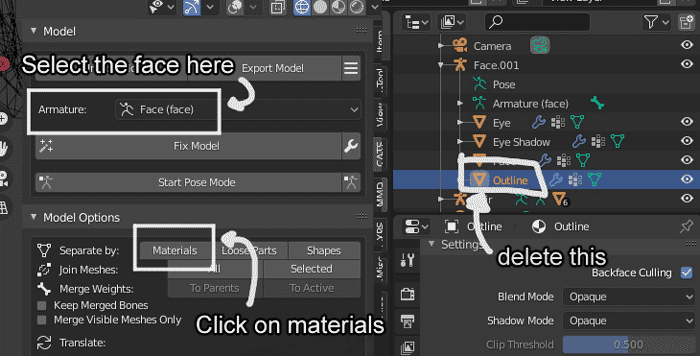
If you want the outline, click the face & go to material properties. You will see more materials this time around. Click on the one called "Outline" and select "Backface Culling" like we did before.
Now look a bit up and on Alpha set the number to 1. Then set the Alpha number to 1 to the rest of materials there (face, eyes, eye shadow). For some reason, face materials are set transparent by default.If you don't want outlines, select the face on CATS, go to "Model Options" and click "Separate by Materials". Now simply delete the mesh called "Outline" on your Collection, inside the Face object.
Also like before, you will have to set the Alpha to 1 for the face meshes/materials if they're shown fully black.
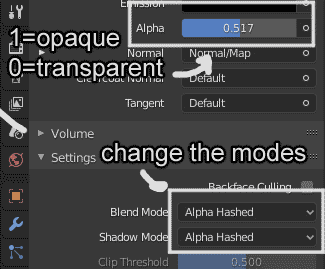
💙 Problem B: "How do I make the eye shadow transparent?"
Click on the face (or the eye shadow mesh if you separated your face material in the previous step), go to "Material Properties", click on the "Eye shadow" material, scroll down and set the Blend and Shadow mode to "Alpha Blend" (usually, they're set to "Opaque"). Then simply change the Alpha to your liking"Alpha Hashed" works as well, but the shadow will look fuzzy rather than solid.
💙 Problem C: "The model looks pink"
Those are missing textures. Click on whatever object is pink, go to "Material Properties", select the pink material and on "Base Color" click the triangle at its left to open the dropdown and select the folder icon. Now just open the texture image and it will work.💙 Problem D: "The face/body/hair are separated meshes, how can I mergue them to pose the model?"
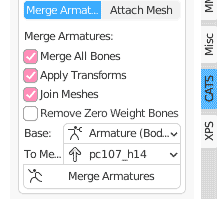
If everything is in place, select all the meshes and press [CTRL]+[A], then select "All transforms".Now press [N] to open CATS and click on "Custom Model Creation". Check "Mergue all bones" and "Apply Transforms", then on "Base" put the BODY mesh, while on "To Merge" put the FACE mesh. Now simply click "Merge Armatures".
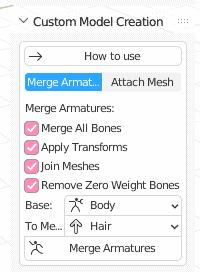
After this, repeat but with the Body as base and the Hair as "To Merge".
💙 Problem E: "The face doesn't move with the neck/hair after creating the custom model"
If you're on 2.8 - Select the model and click on "Fix Model" on CATS.If you're on a newer version - You will have to fix it manually (it's easy, don't worry)
While on Object Mode, click on the armature and go to Edit Mode.Notice there are 2 bones in the centre of the head, a big one (connected to the hair & body) and a smaller one (connected to the face) inside it.
Just select the small bone, then [SHIFT] + click the big one (in this order!). Now press [CTRL]+[P] and click "Keep offset".
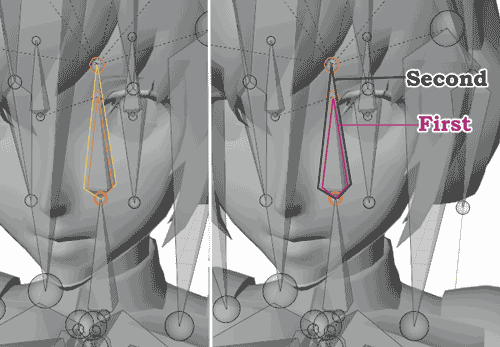
Now your head and neck are connected! Feel free to hide the small bone in pose mode (Right click -> Hide selected), that one just moves the face and nothing else, the big bone is what moves the full thing.
💙 Problem F: "The legs of the model don't move correctly"
This video explains it better than I could. If you're using the fixed FBX models rather than the in-game rips ones, you don't have to click on "Fix Model", simply changing the parenting of the bones work!Also while that person merges redundant bones, I wouldn't do that. The twist bones help to keep the shape of certain areas, please use them when posing the characters!
.PMX (MMD files)
Click on your model, go to "Material Properties", click on the material named after the part you want to hide & scroll down to "Alpha". Set the Alpha number to 0.
In the case of eyeshadow, set the Alpha to your liking. The material should be called something like "Eyeshmt"💛 Problem B: "My model looks pink despite having all the correct textures!"
Click on your model, go to "Material Properties", select the pink material and scroll all the way down. Then uncheck "Use Shared Toon texture"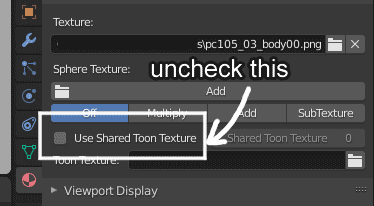
Select the armature and go to Pose Mode (button is at top left, if you have just opened Blender it should say "Object Mode"). Click on any of the lower leg bones and go to Bone Constrain Properties.
Now either close both eye icons (in case you want the constrain later) or click on the X to delete the constrain.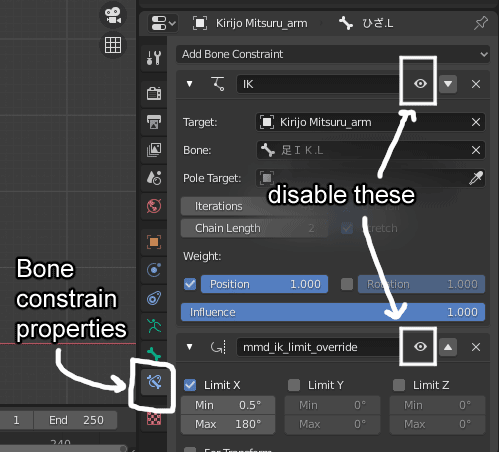
.XPS (XNALara files)
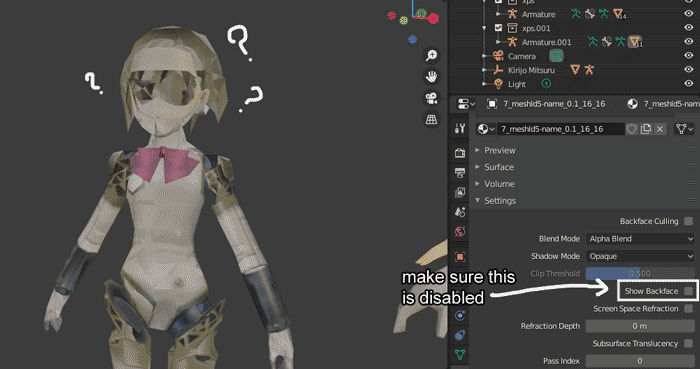
This can happen with any filetype/model, It can be two things.
First, select the model, go to "Material Properties" and make sure Show Backface is disabled.If you're using Cycles as rendering engine, this option won't appear but the model will look fine in rendering view.
This should fix it, but if it doesnt....
💜 Problem B: "Main bones disappeared after making a custom model"
This is a problem I have only encountered on Xelandis' NSFW models, but it may happen on other ones as well.If you have created a custom model using CATS and the main bones disappeared ("L_arm") and only the auxiliary ones remain ("L_arm_roll" "L_arm_adj" etc), revert the model creation, uncheck "Remove zero weight bones" on CATS and click on model creation again.
The main bones should appear now.
🎀 How to pose models
And finally, after spending 2 hours fixing the model, it's time to pose i!
Place your model anywhere on the workspace by clicking on both the mesh and armature and pressing [G]. To snap the movement to a single axys, right after pressing [G] press [Y] [X] or [Z].Click on the armature and go to "Pose Mode" (button is at top left, if you have just opened Blender it should say "Object Mode").
If you need an exagerated pose, you can use [G] to move the body parts outside their usual range, but usually you will rotate the bones:It's as easy as clicking on any bone and pressing [R] to move them. You can snap the movement to a single axys the same as you did before.
I like to work seting the view on ortographic (Numberpad [1] [3] [7] [9]) and moving the body parts like that since each view locks the rotation automatically (it's weird to explain, just try it yourself).These views also make it easier to place the model right where you want,
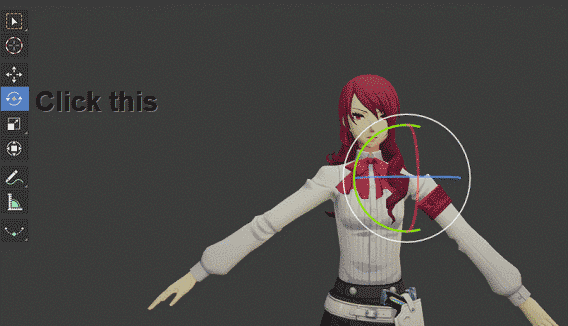
You can also use the rotation gizmo, which makes it more visual & you don't have to press so many keyboard keys. Simply click the "Rotate" button on your left and click+drag the orb that appears when selecting a bone.
If you're using a XPS model, you will have to change her expresion manually by moving and rotating the face bones. But for FBX and PMX ones, it's much easier.
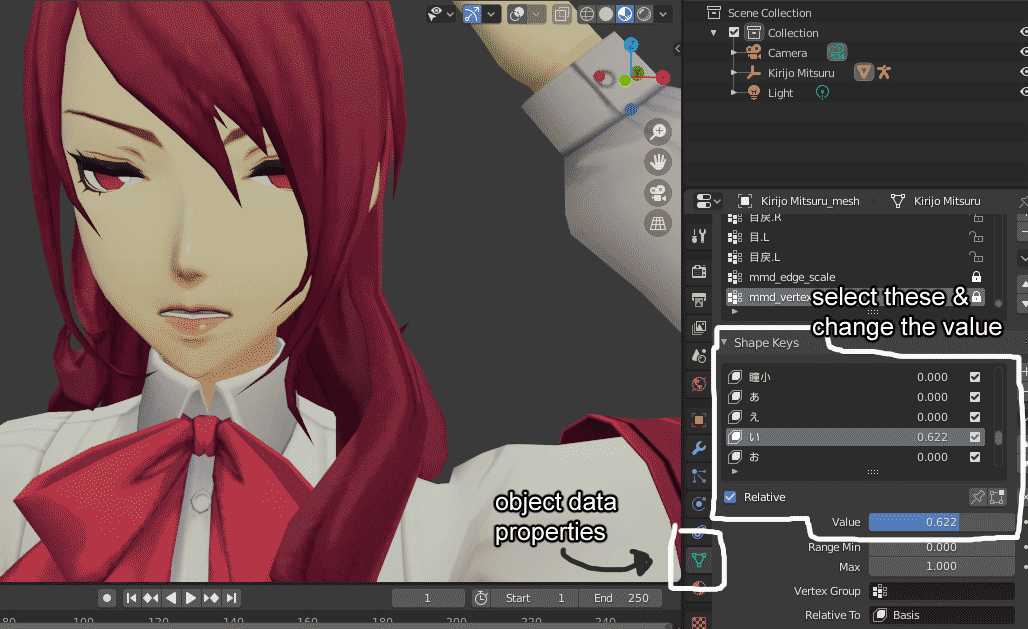
Go back to Edit Mode, click on your mesh and go to Object Data Properties. Here, below "Vertex Groups" you will find "Shape Keys", that will let you change expression, add objects and other stuff depending on the model.Simply click on any shape key & change the Value to see what it does. You can combine various shape keys to create expressions.
Also the fixed faces (on the masterdoc above) have better shape keys since they use the in-game facials, but the MMD faces are workable as well.
 💙 TIPS
- If while you're posing/moving objects the camera gets stuck (you can't zoom in/out or pan), click on any object, and then go to View -> Frame Selected. This will unstuck the camera
- MMD objects are a pain to move. To fix this, on your collection select the MMD mesh and click Object->Set Origing->Origin to Geometry. Now it doesn't rotate in relation to the center of the workspace.
- It's useful to set your camera early & check its view from time to time as you pose to see how the render is looking. Press [Numberpad 0] to change to the camera/render view. You can pose and move around stuff while on this view too.
🎀 Rendering the image
First, set up the camera. Move yourself around the viewport to find an angle you like, then click on the Camera on your Collection, and with the mouse over the workspace, press [CTRL]+[ALT]+[Number Pad 0] to align the camera (what will be rendered) to your current view.
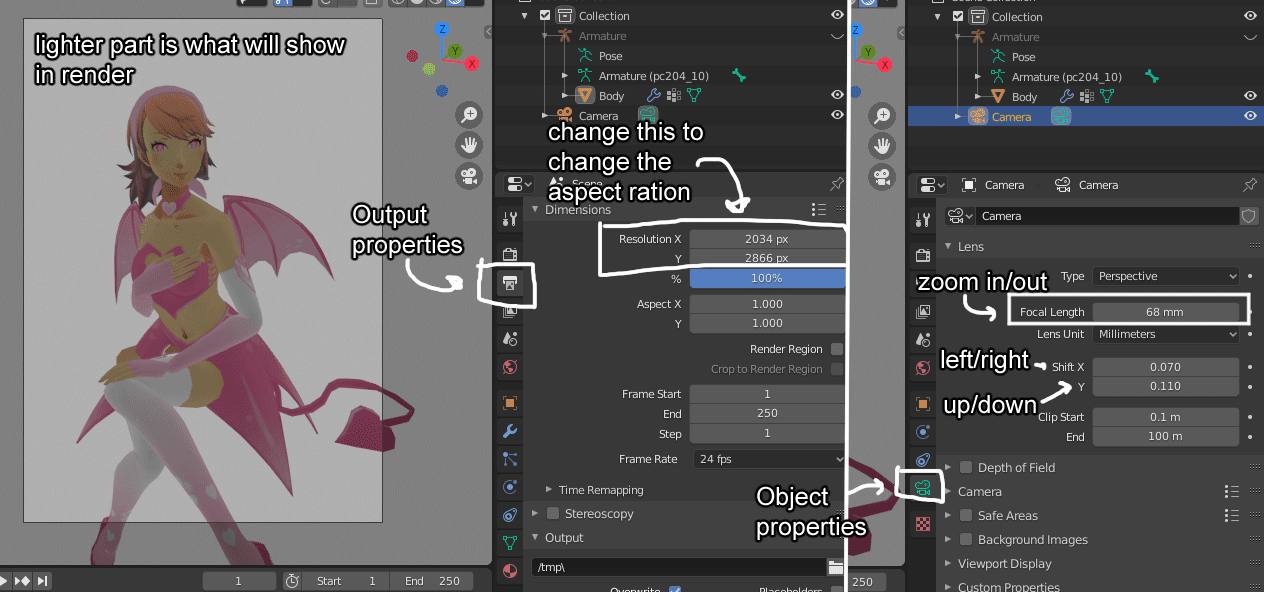
To change the size of the render, go to Output Properties and change it. Leave the % and aspect be.And to center the render, click on the Camera on your Collection, then go to Object Data Properties (Icon should be a camera now). Focal Lenght zooms in/out, while Shift X/Y moves the camera to the sides & up/down
Now you have to put lights so the render isn't dark.
If for whatever reason you don't want to light your render, simply go to World Properties (the red circle/world icon) and make "Color" pure white to give everything a general light.If you want to light, either keep the World color the default grey or make it darker/change its color to other.
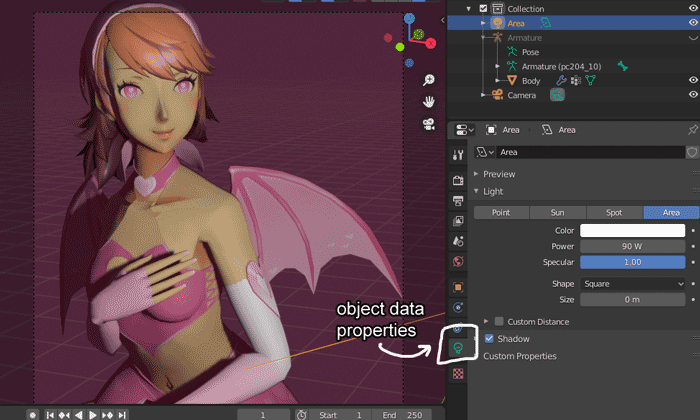
You most likely have a light object on your workspace. I like to remove it and add my own light object to have better control, so click on Light on your collection and delete it.Then press [SHIFT]+[A] and go to Light->[any]. This is a basic tutorial, so I won't go over shaders or different light types, but feel free to experiment with them. I will just add an Area since it's very versatile & I only want to light a single object rather than a scene.
You can move the Area like any object, just press [G] to move around, [S] for scale, [R] rotate, etc. Once you have moved it to the place you want, just like with the camera, select Area on your collection and go to Object Data Properties, this time the icon should be a light bulb,The options are pretty straighfoward, select Area (since that's your object type). Power changes how much light it emits. The smaller the area is, the sharper the shadow it casts will be.
You can add as many light sources of as many colors you want, play with them.
Now that you have everything posed, lighted and focused with the camera, you have to set the final product.
Go to Render Properties. There are TONS of options here and each rendering engine has differen ones, so I will just mention 2 important things
You don't have to overdo it tho, I usually use 250 for Eevee and 150 for Cycles (Cycles could benefit from a bit more, but my laptop cant run that)
Under Film you can make the render transparent by checking the Transparent option. By default, the background will be a solid color of whatever color "World" is.
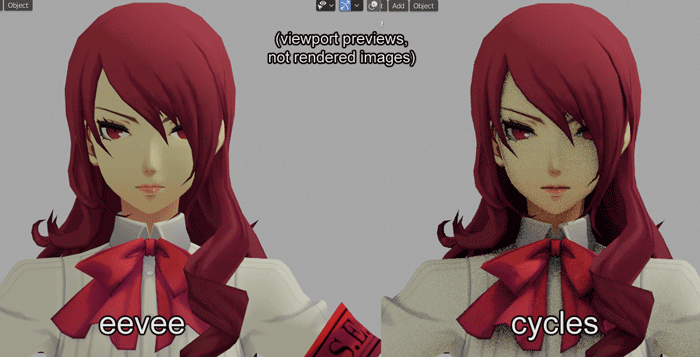
Of course if you have put your model on a background/stage, this wont do much, but if you're rendering a simple posed model like the above Yukari you may want to check it to give the render a background on any photo editing program.Finally, the render engines: Eevee and Cycles. Each one has their own options, pros and cons; pick the one you see the most fit.
Eevee is better suit for cell-shaded renders and such, and even a toaster can render using it.
Like 80% of renders you see online have post-editing, so feel free to open your render on any editing program & add filters, lights etc etc
Aaaand that's pretty much it, I hope I didn't forget anything o(* ̄▽ ̄*)ブ Been 9 hours writting this non-stop
I hope you find this useful, feel free to ask me any questions if you're confused by anything!!And of course, if I got anything wrong, please correct me 🙏 I'm still new after all